Remove Punctuation From String
Question:
Write a python program to remove punctuations from a string
Program:
|
1 2 3 4 5 6 7 8 9 10 11 12 13 |
# define punctuation punctuations = '''!()-[]{};:'"\,<>./?@#$%^&*_~''' my_str = input("Enter a string: ") # remove punctuation from the string no_pt = "" for char in my_str: if char not in punctuations: no_pt = no_pt + char # display the unpunctuated string print(no_pt) |
Explanation:
There are fourteen punctuation marks commonly used in English grammar. They are the period, question mark, exclamation point, comma, semicolon, colon, dash, hyphen, parentheses, brackets, braces, apostrophe, quotation marks, and ellipsis.
Output:
|
1 2 |
Enter a string: GlobalSQA!! on^ the& swing)( GlobalSQA on the swing |
Checkout more Python Programs
Click hereAddition of Two Matrices
Question:
Write a python program to add two matrices
Program:
|
1 2 3 4 5 6 7 8 9 10 11 12 13 14 15 16 17 18 19 20 21 22 23 24 25 26 27 28 29 30 31 32 33 34 35 36 37 38 39 40 41 42 43 44 45 |
m=int(input("ENTER MARTIX ROW SIZE m : ")) n=int(input("ENTER MARTIX COLUMN SIZE n : ")) #initializing matrix elements as 0 X = [[0]*n for j in range(m)] Y = [[0]*n for j in range(m)] result = [[0]*n for j in range(m)] #getting input to matrix X for i in range (m): for j in range (n): print ('entry in row: ',i+1,' column: ',j+1) X[i][j] = int(input()) #printing first matrix X print "FIRST MATRIX : " for i in range (m): for j in range (n): print X[i][j],"\t", print "\n" #getting input to matrix X for i in range (m): for j in range (n): print ('entry in row: ',i+1,' column: ',j+1) Y[i][j] = int(input()) #printing second matrix Y print "SECOND MATRIX : " for i in range (m): for j in range (n): print Y[i][j],"\t", print "\n" #adding X and Y to result for i in range(len(X)): for j in range(len(X[0])): result[i][j] = X[i][j] + Y[i][j] #displaying result print "SUM OF MATRICES IS : " for i in range (m): for j in range (n): print result[i][j],"\t", print "\n" |
Explanation:
If A and B are the two matrices for addition, both of them must be of the same order.
If i and j are the index positions, then result[i][j] = A[i][j] + B[i][j]
Output:
|
1 2 3 4 5 6 7 8 9 10 11 12 13 14 15 16 17 18 19 20 21 22 23 24 25 26 27 28 29 30 31 |
ENTER MARTIX ROW SIZE m : 2 ENTER MARTIX COLUMN SIZE n : 2 entry in row: 1 column: 1 2 entry in row: 1 column: 2 2 entry in row: 2 column: 1 2 entry in row: 2 column: 2 2 FIRST MATRIX : 2 2 2 2 entry in row: 1 column: 1 9 entry in row: 1 column: 2 9 entry in row: 2 column: 1 9 entry in row: 2 column: 2 9 SECOND MATRIX : 9 9 9 9 SUM OF MATRICES IS : 11 11 11 11 |
Checkout more Python Programs
Click hereHCF Python Program
Question:
Write a python program to find the HCF
Program:
|
1 2 3 4 5 6 7 8 9 10 11 12 13 14 15 16 17 18 |
#Program to find the H.C.F of two input number def HCF(x, y): # choose the smaller number if x > y: small = y else: small = x for i in range(1, small+1): if((x % i == 0) and (y % i == 0)): hcf = i return hcf n1 = int(input("Enter first number: ")) n2 = int(input("Enter second number: ")) print "The H.C.F. of", n1,"and", n2,"is",HCF(n1, n2) |
Explanation:
The Highest Common Factor (H.C.F) of two (or more) numbers is the largest number that divides evenly into both numbers. In other words the H.C.F is the largest of all the common factors. The common factors or of 12 and 18 are 1, 2, 3 and 6. The largest common factor is 6, so this is the H.C.F. of 12 and 18.
Output:
|
1 2 3 4 5 |
Enter first number: 10 Enter second number: 5 The H.C.F. of 10 and 5 is 5 |
Checkout more Python Programs
Click hereFactorial Using Recursion
Question :
Write a program to find the factorial of a number using recursive function
Program:
|
1 2 3 4 5 6 7 8 9 10 11 12 13 14 15 |
# The recursive function def factorial(n): if n == 1: return n else: return n*factorial(n-1) # take input from the user num = int(input("Enter a number: ")) # check is the number is negative if num < 0: print "Sorry, factorial does not exist for negative numbers" elif num == 0: print "The factorial of 0 is 1" else: print "The factorial of",num,"is",factorial(num) |
Explanation:
Factorial of a number is the product of all natural numbers till that number. It does not exist for negative numbers.
For example, the factorial of 4 would be 1*2*3*4=24
A recursive function is a function that calls on itself. In the above recursive function, the function calls on itself with n-1 as argument till n becomes 1 and 1 is returned. Each time the function is called, product the corresponding n and the factorial of n-1 is returned. Hence, factorial is found.
Output:
1.
|
1 2 |
Enter a number: -9 Sorry, factorial does not exist for negative numbers |
|
1 2 |
Enter a number: 1 The factorial of 1 is 1 |
|
1 2 |
Enter a number: 9 The factorial of 9 is 362880 |
Checkout more Python Programs
Click hereFactors of a Number
Question:
Write a python program to find the factors of a given number
Program:
|
1 2 3 4 5 6 7 8 9 10 11 12 |
# Python Program to find the factors of a number # This function takes a number and prints the factors def factors(x): print "The factors of",x,"are:" for i in range(1, x + 1): if x % i == 0: print i n = int(input("Enter a number: ")) factors(n) |
Explanation:
The factors of a number are any numbers that divide into it exactly. This includes 1 and the number itself. For example, the factors of 6 are 1, 2, 3 and 6. The factors of 8 are 1, 2, 4 and 8. For larger numbers it is sometimes easier to ‘pair’ the factors by writing them as multiplications.
Output:
|
1 2 3 4 5 6 7 8 9 10 11 |
Enter a number: 10 The factors of 10 are: 1 2 5 10 |
Checkout more Python Programs
Click hereLargest of Three Numbers
Question
Write a python program to find the largest of three numbers
Hint: Use if and elif
Program:
|
1 2 3 4 5 6 7 8 9 10 11 12 13 14 15 16 17 18 19 20 21 22 23 24 25 |
#Accept three numbers print "Enter the numbers for comparision" nos1 = input("Enter first number: ") nos2 = input("Enter second number: ") nos3 = input("Enter third number: ") #Comparison using if elif clauses if (nos1 > nos2) and (nos1 > nos3): large = nos1 elif (nos2 > nos1) and (nos2 > nos3): large = nos2 else: large = nos3 print "The largest number is",large |
Explanation:
Three numbers are accepted from the user ‘nos1′,’nos2′,’nos3’.
First ‘nos1’ is checked.If it is greater than both ‘nos2’ and ‘nos3’, then ‘large’ is allocated wth the value of ‘nos1’
Otherwise ‘nos2’ is checked. If it is greater than both ‘nos1’ and ‘nos2’,then ‘large’ is allocated with the value of ‘nos2’
Otherwise ‘large’ is allocated with ‘nos3’
Output:
|
1 2 3 4 5 6 7 8 9 |
Enter the numbers for comparision Enter first number: 89 Enter second number: 23 Enter third number: 10 The largest number is 89 |
Checkout more Python Programs
Click hereLCM of Two Numbers
Question:
Program to find the LCM of two numbers
Program:
|
1 2 3 4 5 6 7 8 9 10 11 12 13 14 15 16 17 18 19 20 21 22 23 24 25 26 27 28 29 30 31 32 33 34 35 36 37 38 39 |
# Python Program to find the L.C.M. of two input number # defining a user defined function for finding LCM def lcm(x, y): # choose the greater number if x > y: large = x else: large = y while(True): if((large % x == 0) and (large % y == 0)): lcm = large break large += 1 return lcm nos1 = int(input("Enter first number: ")) nos2 = int(input("Enter second number: ")) print "The L.C.M. of", nos1,"and", nos2,"is", lcm(nos1, nos2) |
Explanation:
A common multiple is a number that is a multiple of two or more numbers. The common multiples of 3 and 4 are 0, 12, 24, …. The least common multiple(LCM) of two numbers is the smallest number (not zero) that is a multiple of both.
Output:
|
1 2 3 4 5 |
Enter first number: 6 Enter second number: 3 The L.C.M. of 6 and 3 is 6 |
Checkout more Python Programs
Click hereThe Palindrome Program
Question
Write a python program to check whether given string is palindrome or not without using any inbuilt function to reverse the string
Program:
|
1 2 3 4 5 6 7 8 9 10 11 12 13 14 15 16 17 |
# Program to check if a string is palindrome or not take input from the user string = raw_input("Enter a string: ") #Use inbuilt function to convert all characters to lowercase string = string.lower() # check if the string is equal to its reverse if string == string[::-1]: print("It is palindrome") else: print("It is not palindrome") |
Explanation:
A palindrome is a string which is same read forward or backwards. Dad is a palindrome while Python is not.
In the program, we first accept the string to ‘string’. Since capital letters and small letters are perceived differently because of difference in ASCII codes, we convert the string to all lower for uniformity using inbuilt function ‘x.lower()’ where x is the string
In the above program, we have used the slice operator to reverese the string.The slice operator[n:m:p] returns the part of the string from nth to the (m-1)th character Setting p to -1 returns the reverse order of the slice of string you asked for. Since here we want the whole string, we use the shorthand [::-1]
Compare both the string and it’s reversal. If they are equal, then it’s a palindrome, otherwise not.
Output:
1.
|
1 2 3 |
Enter a string: Dad It is palindrome |
|
1 2 3 |
Enter a string: Python It is not palindrome |
Checkout more Python Programs
Click herePython Armstrong program
Question 2
Write a Python program to check whether a given number is armstrong or not.
Program:
|
1 2 3 4 5 6 7 8 9 10 11 12 13 14 15 16 17 18 19 20 21 22 23 24 25 26 27 28 29 30 31 |
# Python program to check if the number provided by the user is an Armstrong number or not # take input from the user nos = int(input("Enter a number: ")) # initialize sum sum = 0 # find the sum of the cube of each digit temp = nos while temp > 0: digit = temp % 10 sum += digit ** 3 temp //= 10 # display the result if nos == sum: print nos,"is an Armstrong number" else: print nos,"is not an Armstrong number" |
Explanation:
Armstrong number is the number whose sum of cube of individual digits is equal to the number itself.
Output:
1.
|
1 2 3 |
Enter a number: 371 371 is an Armstrong number |
|
1 2 3 |
Enter a number: 56 56 is not an Armstrong number |
Checkout more Python Programs
Click hereThe Fibonacci Sequence
Question:
Program to print the Fibonacci Number
Program:
|
1 2 3 4 5 6 7 8 9 10 11 12 13 14 15 16 17 18 19 20 21 22 23 24 25 26 27 28 29 30 31 32 33 34 35 36 37 38 39 40 41 |
# Program to display the Fibonacci sequence up to n-th term n= int(input("Enter Limit: ")) # first two terms n1 = 0 n2 = 1 count = 0 # check if the number of terms is valid if n <= 0: print "Fibonacci exist only for positive numbers" elif n == 1: print "Fibonacci sequence upto",n,":" print n1 else: print "Fibonacci sequence upto",n,":" while count < n: print n1, n3 = n1 + n2 # update values n1 = n2 n2 = n3 count += 1 |
Explanation:
A Fibonacci sequence is the integer sequence of 0, 1, 1, 2, 3, 5, 8….
The first two terms are 0 and 1. All other terms are obtained by adding the preceding two terms
Ex: 5th term is sum of 4th and 3rd term;3=2+1
Output:
1.
|
1 2 3 4 5 |
Enter Limit: 10 Fibonacci sequence upto 10 : 0 1 1 2 3 5 8 13 21 34 |
|
1 2 3 |
Enter Limit: -5 Fibonacci exist only for positive numbers |
|
1 2 3 4 5 |
Enter Limit: 1 Fibonacci sequence upto 1 : 0 |
Checkout more Python Programs
Click hereMultiplication Table
Question;
Write a program to print the multiplication table of a number
Program:
|
1 2 3 |
num = int(input("Display multiplication table of: ")) for i in range(1,11): print(num,'x',i,'=',num*i) |
|
1 2 3 4 5 6 7 8 9 10 11 |
Display multiplication table of: 17 17 x 1 = 17 17 x 2 = 34 17 x 3 = 51 17 x 4 = 68 17 x 5 = 85 17 x 6 = 102 17 x 7 = 119 17 x 8 = 136 17 x 9 = 153 17 x 10 = 170 |
Checkout more Python Programs
Click herePrint Python Built-In Function Documentation
Question:
Write a program to print some Python built-in functions documents, such as abs(), int(), raw_input(). The built-in document method is __doc__.
Program:
|
1 2 3 4 5 6 7 8 9 10 11 12 13 |
print abs.__doc__ print int.__doc__ print raw_input.__doc__ def square(num): '''Return the square value of the input number. The number must be integer. ''' return num ** 2 print square(2) print square.__doc__ |
Explanation:
Python documentation strings (or docstrings) provide a convenient way of associating documentation with Python modules, functions, classes, and methods. An object’s docsting is defined by including a string constant as the first statement in the object’s definition
Output:
|
1 2 3 4 5 6 7 8 9 10 11 12 13 14 15 16 17 18 19 20 21 22 23 24 25 26 27 |
abs(number) -> number Return the absolute value of the argument. int(x=0) -> int or long int(x, base=10) -> int or long Convert a number or string to an integer, or return 0 if no arguments are given. If x is floating point, the conversion truncates towards zero. If x is outside the integer range, the function returns a long instead. If x is not a number or if base is given, then x must be a string or Unicode object representing an integer literal in the given base. The literal can be preceded by '+' or '-' and be surrounded by whitespace. The base defaults to 10. Valid bases are 0 and 2-36. Base 0 means to interpret the base from the string as an integer literal. >>> int('0b100', base=0) 4 raw_input([prompt]) -> string Read a string from standard input. The trailing newline is stripped. If the user hits EOF (Unix: Ctl-D, Windows: Ctl-Z+Return), raise EOFError. On Unix, GNU readline is used if enabled. The prompt string, if given, is printed without a trailing newline before reading. 4 Return the square value of the input number. The number must be integer. |
Checkout more Python Programs
Click hereHow to Debug Code with Android Studio
How to Debug Code with Android Studio
Being Tester we are used to reporting bugs and we know that developer debug the code to find out the line of code causing the bug. But now you are the one coding the test cases and you are responsible for solving any bug in your testing framework.
Android Studio provides some shortcut keys for debugging. In this post, we will use our HelloWord Espresso test Case Example and We will run our test Case In Debug mode and we will debug our code line by line.
It is always good practice to use Debug Mode for root tracing the bug as it allows you to run your code line by line by setting a debug point. Debug point is the nothing but marking the line of code from which you wish to start debugging. This speeds up your work and efficiency.
- In your Android Studio project copy the below test case.
-
12345678910111213141516171819202122232425262728293031323334353637383940414243444546474849505152535455565758596061626364656667package com.example.globalsqa.myapplication1;import android.app.Activity;import android.app.Instrumentation;import android.app.LauncherActivity;import android.content.Intent;import android.support.test.InstrumentationRegistry;import android.support.test.rule.ActivityTestRule;import android.support.test.runner.AndroidJUnit4;import android.support.test.runner.AndroidJUnitRunner;import android.test.ActivityInstrumentationTestCase2;import android.test.ActivityUnitTestCase;import android.test.InstrumentationTestRunner;import android.test.suitebuilder.annotation.SmallTest;import android.view.ContextThemeWrapper;import android.widget.TextView;import com.example.globalsqa.myapplication1.MainActivity;import com.robotium.solo.Solo;import org.junit.*;import org.junit.runner.RunWith;import org.junit.runners.JUnit4;public class MyActivityTest extends ActivityInstrumentationTestCase2<Activity> {private static final String LAUNCHER_ACTIVITY_CLASSNAME = "com.example.globalsqa.myapplication1.MainActivity";private static Class<?> launchActivityClass;static {try {launchActivityClass = Class.forName(LAUNCHER_ACTIVITY_CLASSNAME);} catch (ClassNotFoundException e) {throw new RuntimeException(e);}}private Solo solo;public MyActivityTest() {super((Class<Activity>) launchActivityClass);}@Overridepublic void setUp() throws Exception {super.setUp();solo = new Solo(getInstrumentation(), getActivity());}@Testpublic void testText() throws Exception {// s=new Solo(this.getInstrumentation(),getActivity());solo.waitForView("MainActivity");Thread.sleep(3000);TextView t = (TextView) solo.getCurrentActivity().findViewById(R.id.globalsqa);assertEquals("Hello world!", t.getText().toString());}public void tearDown() throws Exception {solo.finishOpenedActivities();super.tearDown();}}
- Now we will set a debug pointer. Suppose we are confident that our test of code is working fine except our test and we wish to debug the test case then we will place our debug pointer at the first line inside our test case. For this click on the left side space in front of the selected line and the pointer is set as shown the below screenshot(Red Dot represents the debug point).

- Now we need to run our test case in Debug mode. Select the class name -> right click -> Debug as “MyActivityTest”. Make sure that the Android device is attached to your computer with USB debugging ON.

- As soon as your code runs till the debug point. You will see a debug console on your bottom left side and the code stops running at the debug point. Now the control is in your hands to run the code line by line.
- The button highlighted in below screenshot allows you to run the rest of the code. When you click on it rest of the code runs automatically.
- The button highlighted in below screenshot allows you to run the code step by step. Each time you click the button the line highlighted in the code gets executed.
- You can also observe what is getting stored in your variables by opening checking variable window –


This will help you debug your test cases and write a efficient and bug free code.
How to Get Code Coverage with Jacoco and Espresso
How to Get Code Coverage with Jacoco and Espresso
Finding code coverage is very important for testing because it allows you to measure your testing efforts. If you have a test suite prepared for your application but you are not sure test suite covers how much percentage of code then finding the code coverage will be good practice Once you get the coverage report, you will know exactly what part of code is not covered in your test case and then you can add test cases to cover the code.
Jacoco is java code coverage tool which allows you to calculate code coverage for your unit tests and instrumented tests. Jacoco can be used with Ant, Maven & Gradle build tools. Today, I will show you step by step integration of Jacoco with Gradle for Espresso test suite.
I have done this setup for Simple Hello world project to give idea of how Jacoco works and gives proper code coverage report.
Pre-requisite –
- Android Studio
- Junit
- Espresso Setup
- Espresso Test Case written as per our previous post for “Hello Word”
How to Setup Jacoco and Get Coverage ?
-
- Create an android project as shown in my previous post.
- Create a java class inside src->main->androidTest and write your Espresso test case in the class
- Create a new class named AndroidJococoTestRunner in src -> main ->androidTest and copy below code inside the class.
- Create an android project as shown in my previous post.
|
1 2 3 4 5 6 7 8 9 10 11 12 13 14 15 16 17 18 19 20 21 22 23 24 25 26 27 28 29 30 31 32 33 34 35 36 37 |
import android.os.Bundle; import android.support.test.runner.AndroidJUnitRunner; import android.util.Log; import java.io.IOException; import java.lang.reflect.Method; import java.nio.charset.Charset; public class AndroidJacocoTestRunner extends AndroidJUnitRunner { private static final Charset UTF8 = Charset.forName("UTF-8"); static { // System.setProperty("jacoco-agent.destfile", "/sdcard/coverage.ec"); } @Override public void finish(int resultCode, Bundle results) { try { Class rt = Class.forName("org.jacoco.agent.rt.RT"); Method getAgent = rt.getMethod("getAgent"); Method dump = getAgent.getReturnType().getMethod("dump", boolean.class); Object agent = getAgent.invoke(null); dump.invoke(agent, false); } catch (Throwable e) { final String trace = Log.getStackTraceString(e); try { System.out.write(trace.getBytes(UTF8)); } catch (IOException ignored) { } } super.finish(resultCode, results); } } |
-
- Open app-> build.gradle and copy below code in defaultConfig.
|
1 2 3 4 5 6 |
testInstrumentationRunner "com.example.anuja.myapplication1.AndroidJacocoTestRunner" also add code given below in buidTypes. debug { testCoverageEnabled = rue } |
-
- Then click on Gradle on right side of Android studio -> click on refresh -> other -> right click on createDebugAndroidTestCoverageReport -> click on run
- Then click on Gradle on right side of Android studio -> click on refresh -> other -> right click on createDebugAndroidTestCoverageReport -> click on run

-
- This action will run all the test cases inside src->main->androidTest and give the report in app->build-> reports ->coverage -> debug.
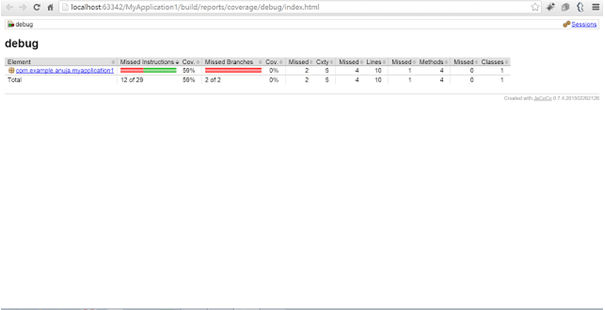
- pen index.html file in the browser to check the code coverage report as shown in below screenshot.
How to Write and Run First Test Case in Android Studio?
How to Write and Run First Test Case in Android Studio?
So far we have learnt on creating our Android Studio project and overview of Junit and TestNG testing framework. In this Tutorial, we will write our first test case and run it. It sounds exciting but before that we need to decide a testing tool which we want to use for writing testing Framework.
We have many famous testing tools in market like Appium, Robotium , Espresso etc. Espresso is an open source framework provided by Android Studio so let use that to write our first test case.
The main purpose of this tutorial is to learn to write and run test case in Android Studio so we will focus on this and not on testing tools. We will learn about testing tools in future posts.
Perquisite –
- Create an Android Studio Project
- Configure TestNG Framework.
- Configure Espresso Tool
Steps for Writing Test Cases –
-
-
- Go to app -> src ->androidTest -> Java
- Go to app -> src ->androidTest -> Java
-

-
-
- Right click on the package name
- Right click on the package name
-

-
-
- Go to New -> Java Class and click
- Enter File Name and Click on Ok.
- “Now your java class is ready.>
-

Now we will write a simple code as per given below
|
1 2 3 4 5 6 7 8 9 10 11 12 13 14 15 16 17 18 19 20 21 22 23 24 |
@RunWith(AndroidJUnit4.class) @LargeTest public class EspressoTest1 extends ActivityInstrumentationTestCase2<MainActivity>{ public EspressoTest1() { super(MainActivity.class); } @Before public void setUp() throws Exception { super.setUp(); injectInstrumentation(InstrumentationRegistry.getInstrumentation()); } @Test public void test1ChatId() { getActivity(); onView(withId(R.id.helloworld)).check(matches(isDisplayed())); } @After public void tearDown() throws Exception { super.tearDown(); } } |
1. The class uses two annotations @LargeTest and @Runwith these two annotations are used to specify the behavior for our TestClass.
2. The class extends AcitivtyInstrumentationTestCase2 class with launch activity as MainActivity which we want to test in this example.
3. @Before and @After is annotations and used to specify which method should be executed before each test case and which method should be executed after completion of each test case.
4.@Test annotation is added for each test case method.
5. In the below test case the getAcitivity() launches our Main Activity.
6. onView() is used to select a view for testing and withId() is used to locate the UI element and rest is used to check whether the particular element is displayed or not.
Running Test Case –
-
-
-
- For Android Studio Version Less than 2.1
- Click on Build Variants
- For Android Studio Version Less than 2.1
- Select Android Instrumentation Tests
- Right click on class name and click on Run
- For Android Studio Versions More than 2.1
- Right click on class name and click on Run
-
-

How to Configure TestNG in Android Studio ?
How to Configure TestNG in Android Studio?
In our previous tutorial, we have learnt about Junit Testing framework and now in this we will get to know about one more powerful testing framework called TestNG. TestNG framework as some different functionalities which makes it more powerful testing framework..
What is TestNG Framework?
TestNG is a testing framework developed from inspiration of Junit and Nunit with additional features making is more effective and simple for use. It is a powerful automation testing framework where NG Stands for Next Generation. It gives developers power to write more flexible and powerful test cases.
Features of TestNG –
- It allows you to use new features of Java programming language while writing test cases.
- Like Junit it provides annotations to identify your test methods and flow of execution.
- Separates compile time test code and run time configurations.
- Provides powerful test case execution support.
- Allows you to perform multithreading testing.
- Initially It was designed for unit testing but now allows load testing , parallel testing etc.
There is so much more in this and we will explore more and more when we start coding. But it is very important to learn basics about Testing frameworks before writing your test cases as selection of right framework is like building pillar for your automation framework.
How to Setup TestNG –
-
- Create and Android Project or open your existing project
-
- Go to app -> build.gradle
- Go to app -> build.gradle

- Copy the below line of code in your dependencies section.
1testCompile 'org.testng:testng:6.9.10' - Click on Sync
- Once you get build successful message then you are ready to go.

How to Configure Junit Testing Framework in Android Studio
How to Configure Junit Testing Framework in Android Studio?
In our previous post, we talked about the Android Studio and Java Installation. In this we will learn about very famous unit testing framework setup for android studio that is Junit. Before jumping on to the setup let us learn more about Junit Testing Framework.
What is Junit ?
Junit is a widely used testing framework used for Java Programming language. Before you learn, how to write automated test cases it is very important to learn Junit testing framework in detail. It helps you to define the flow of your testing framework.
Junit is built on idea of “first testing and then coding” which helps in increasing productivity of the test case developer and stability of the code.
Features of Junit Testing –
- It is open source testing framework allowing users to write and run test cases effectively.
- Provides various types of annotations to identify test methods.
- Provides different types of Assertions to verify the results of test case execution.
- It also gives test runners for running tests effectively.
- It is very simple and hence saves time.
- It provides ways to organize your test cases in form of test suits
- You can integrate Junit with Eclipse, Android Studio, Intellij etc.
How to Setup JUnit–
-
- Create a new Project in Android Studio – (Refer our previous post)
-
-
- Go to app -> build.gradle
- In the file add below line of code in dependencies section:
- testCompile group: ‘junit’, name: ‘junit’, version: ‘4.12’
- testCompile group: ‘junit’, name: ‘junit’, version: ‘4.12’
- Go to app -> build.gradle
-
- Click on Sync
- Once you get Build is Successful message then your Junit Framework is Set and you can use it while writing your test cases
- Note – We will see how to use Junit in your test cases in our future posts
- Click on Sync
-


How to install Android Studio?
How to install Android Studio?
A Manual tester want to start and learn automation, there are many curiosity come to their mind about what tool to use?, which IDE(Integrated Development Environment) to select?, what testing framework to select? This tutorial will help you to know about an IDE called Android Studio. IDE is nothing but development environment for writing and executing code.
Android Studio is the official IDE for coding android app, but it is also very good alternative for writing and executing test cases. Android Studio is very easy to install and faster to write, deploy and run.
Let us see why Android Studio is best suitable for testing
- Android Studio supports both JUnit and TestNG testing framework which are most commonly used for building automation framework.
- We can use various automation tool with Android Studio like Appium, Espresso and Robotium etc.
- Android Studio provides support for Unit Testing (White box testing) and Instrumentation Testing (Black box testing).
- After Test case execution, Android Studio generates html report as an overview of passed and failed test cases.
- Most interesting feature provided by Android Studio is we can calculate code coverage on the basis of test cases written. This helps us measure our testing efforts.
After knowing, how we can effectively use Android Studio for our testing effort. Now, we will see how to install Android Studio. Before installing Android Studio, it is required to install Java.
-
-
- First of all Download latest JDK version from This Link
- Click on “Accept License Agreement” and download latest code.
- Click on .exe file and then java installation window will open.
- Click on next and finish installation.
- Installation doesn’t complete unless you set JAVA_HOME.
- So go to my computer properties.
- Click on Advanced System Settings -> Advanced > Environment Variables
- Click on New under System Variable. Then in Variable Name enter “JAVA_HOME” and Variable Value as “Java Installed Path” (It mostly lies in : C:\Program Files\Java\jdk1.8***)
- Now, edit path variable and add “;%JAVA_HOME%\bin” at the end.
- To verify that java is installed successfully, go to command prompt and enter “java – version”. You will see “Java Version 1.8.***”
-


-
- Now Download Android Studio from THIS LINK
- Click on .exe and install the Android SDK into your system.
- Installation doesn’t complete unless you set ANDROID_HOME. So go to my computer properties.
- Click on Advanced System Settings -> Advanced -> Environment Variables -> New Variable and Variable Name – “ANDROID_HOME” and variable value-” C:\Users A\Downloads\android-sdk . The same way as we did for Java Home
- Then, Select Path Variable -> Edit and then add following path after semicolon (;) %ANDROID_HOME%/tools;%ANDROID_HOME%/platform-tools
Difference between unit tests and instrumentation tests
Difference Between Unit Tests and Instrumentation Tests
Android Studio allows you to write unit test as well as instrumentation tests. It is very important for us to learn more about unit tests and instrumentation tests. We have defined it in terms of Android Application.
In layman terms, Unit tests are the test cases written for testing code written by developers and Instrumentation test are the test cases written for testing UI & functionality of the application. In short, Unit tests is associated with white box testing and instrumentation tests is associated with black box testing.
Unit Tests –
- Unit tests runs in local JVM and minimizes the execution time.
- Unit Tests cannot test UI of the app without mocking activity objects.
- Unit test are used for white box testing for testing code.
- Most of the time Unit Tests are written by Developers.
- You don’t need a device connected for execution of Unit Tests.
Instrumentation Tests –
- Instrumentation tests are used for black box testing.
- It is used to test GUI of the application along with its functionality in real environment.
- For execution of Instrumentation tests you need a device /emulator on which the application is first installed and then tests are executed.
- Automation Testers are involved in writing instrumentation framework.
Basics of Android Project Structure
Basics of Android Project Structure
Coding with android studio looks very promising because it is an IDE based on IntelliJ IDEA that is used for android application development. Even though we are not going to build android application , it is very important for us to understand the project structure so that we can code effective and understandable automation test framework.
There are five important components of Android Project Structure like main,gradle,.idea, app and External Libraries. Let us Discuss this in detail.
- Main Project –This would be entire project context. Whatever you do in IntelliJ IDEA, you do that in the context of a project. A project is an organizational unit that represents a complete software solution. A project in Android Studio is like a workspace . In android Studio a project, can contain multiple modules. This means that, in theory it is possible to build multiple apps within the same project.
- .idea –.idea is used for storing project specific metadata in Android Studio.
- Project Module –This is the actual project folder where your application code resides. The application folder has following sub directories
- build: This has all the complete output of the make process i.e. classes.dex, compiled classes and resources, etc.
- libs : The lib folder is used for storing project specific jar files..
- src: The src folder can have both application code and android unit test script. You will find two folders named “androidTest” and “main” correspond to src folder. The main folder contains two subfolders java and res. The java folder contains all the java codes and res contains drawables, layouts, etc.
- Gradle – Gradle is used for configuration of build procress. We will see more detais about this in our nest post.
- External Libraries -This is a place where Referenced Libraries and information on targeted platform SDK is shown.
